Interface management tools help you manage the display of alarms in the Alarm List and call records in the Voice Quality of Service (QoS) dashboard.
This topic describes how to create and manage the following filters:
The table filter gives you the flexibility to set up and save filtering schemes ranging from the simple to the complex, to set inclusive or exclusive parameters, and build filter sets with multiple filtering layers.

Within the table filter feature these options are available:
The table filter is located in the upper right corner of a window when a table is displayed. It is always collapsed until you begin building a filter or recalling a saved filter.
- Open the filter feature by clicking the Down arrow adjacent to the text 'Filter.'
- Add the filter parameters: select a column, select a comparator, enter a value against which the comparator will operate.
- Values are not case sensitive unless you select a comparator that includes (Exact).
- After entering a value the filter is automatically invoked; the color of the Filter button changes to orange.
- Note 1: If you move to another page and come back to this page your filter will not be retained. To make a filter a user preference first build the filter and save it, then make it your preferred filter for that page.
- Note 2: Collapse the filter by clicking on the page, away from the filter feature.
Filter layers add both complexity and precision.
- Build a filter; click Add Filter and select parameters for this new layer.
- To add more layers, repeat step 1.
- Click the X icon, to the right of a layer, to remove it from the filter set.
- The filter set is automatically invoked, the color of the Filter button changes to orange and the number of layers is displayed as a counter in the button.
- Save the filter (optional).
- Build a filter and click Save Filter Set As...
- Enter a name and click OK.
- Note 1: Saved filters are not transferable between tables. A filter built for the Alarm List will not be available in the View Calls table.
- Note 2: Saved filters are private. Other users cannot use your saved filter.
Open the Filter feature and select the saved filter from the drop down list.
Open the Filter feature, select the saved filter and click Delete. Confirm your action.
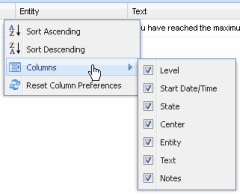
All data presented in tabular form have a common split-column menu of options. The same menu is activated from any of the column headers in the table.
By positioning your cursor over the right side of a column header you will reveal an arrow, which you select to see the split-column options. The arrow is hidden until your cursor is properly positioned.

Available split column options include:
- All Tables
- Selected Tables
Split-Column Options - All Tables back
These options will appear for all tables:
- Sort Ascending -This option sorts the entire table, in ascending order (A to Z), based on this column.
- Sort Descending -This option sorts the entire table, in descending order (Z to A), based on this column.
- Columns -This option opens a submenu showing you all the columns you can display in the table. Add a column by selecting the check box; remove a column by clearing the check box.
- Reset Column Preferences - This option performs two tasks:
- Reverts to a display of the default columns; all other columns are removed from the table.
- Columns are rearranged back to the default order.
Additional Split-Column Options - Select Tables back
These options will appear for a select group of tables:
- Remember Sort - This option retains, as a user preference, whatever sort you have applied to a table. If you go to another page in the application, then return to the page with the sort retained, that is the sort that will be applied.
- Remember Filter - This option retains, as a user preference, whatever filter you have applied to the table. As with Remember Sort, if you leave the page, then return to it, the filter you applied to the table will be preserved. Important to note - this feature will remember how you've filtered the table, whether the filter is saved or not.


